Monday, December 22, 2008

Merry Christmas

I have finished the oven mitts - Hooray!! And just in time. It is 11.00 pm here and I need them for work tomorrow.


It promises to be nice and warm here in Melbourne for Christmas. We are going to my brother's place where the kids can swim and the adults can find a shady place to have a drink (or two...).


We had our first Christmas gathering up in Shepparton on the weekend where we all got to have lunch in the backyard. Some chickens and salads from the chook shop with chocolate ripple cake made by Sofie for desert. Perfect, except for all the mossie bites I have!


Here is a typical Aussie backyard lunch photo - even with the Hills hoist in the background..lol


And here is mum, me, Cheryl, Tess (my niece) and Sofie.


Have a very merry Christmas everyone!

Thursday, December 18, 2008

Cupcake aprons

I am still in Christmas gift making mode and have made 2 aprons for my nieces Laura and Tess. Sofie helped me tonight with the sewing and pressing and Ellen did a little pose with Eames to show the end result. We used two pink and two green co ordinating cupcake cotton fabrics from Spotlight. No pattern was used. We made it up as we went. We made the ties long enough to come around to the front to tie. Some rick rack or trim would have been nice but none could be found!
Here is a closer view of the pink one:
And an even closer view to show the fabric properly. There is silver sparkles on the fabric too.

Since my last post I have made two more little boy sets and am half way through my mitt making. Note to self....do NOT leave it until the week before Christmas to start making gifts......


Sunday, December 14, 2008

Oven Mitts tutorial

Every year I make something Christmassie for my co workers. We are only a small firm of accountants and this year we are all female except for the boss! Last year I made aprons (here too) and the year before table runners. This year it is oven mitts. I couldn't find a tutorial for exactly what I wanted so I just had a go and came up with this:

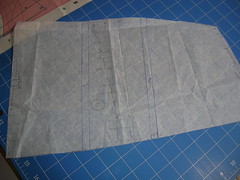
First, trace around your hand or trace a mitt you already have:
Next combine the outside fabric, batting and lining. I couldn't get any insulated batting so I just used poly. It is a bit thick but it should do the job. I could hold my hand against the iron for a few seconds before it got too hot, so I figure these will work for getting dishes out of the oven onto the bench top. I cut the 3 fabrics just long enough to fit one mitt length. I used the full width of the fabric. Easier to quilt that way.
Quilt using the walking foot. I just did straight lines every 5 white lines of the gingham. Fancy quilting would be nice, but I am a novice in this area and this was all I can do! Roll up the fabric as you go to make it easier to fit with your machine.

Cut two pieces from the pattern out of the new quilted "fabric". Cut one and then turn the pattern over to cut the other.

Make some binding. I used a co ordinating Christmas fabric with the 2.5cm wide binder. I cut the fabric on the straight grain to save fabric. It should be ok as I am not trying to go around curves.


Fold the binding in half making sure one side is slightly longer than the other.

Sew up the thumb side at least a few inches before attaching the binding.

Attach the binding with the longer side underneath. This will ensure you will catch it in your stitches.

Sew a couple of extra inches of the binding to make a hanging loop.


Fold the loop bit inside of the mitt before stitching the rest of the mitt together.

Here is the inside after I have finished. I didn't bother finishing off the inside. You could bind, zig zag or serge. I would have bound it I was making these for you ;)). But hey, I have 20 to make and my co workers will not care or even notice. Don't forge to clip to the stitching in the thumb curve to help it sit better when you turn it out.


And the outside:


Now back to the machine....I have another 19 to make :)

Wednesday, December 10, 2008

Little boy PJ's

I saw this really cute Santa embroidery on Embroidables.com and thought I would have a go at making some pyjamas for some little boys. I haven't done much embroidery even though I have had my machine for about 8 years. I have a Janome MC10000.

The idea was to buy some white tshirts and and make little shorts. I looked high and low and couldn't find any white tshirts without logos. So in desperation I made a tshirt! I used a very old pattern that my sister gave me. I found it in amongst my children patterns in a plastic bag - no pattern envelope! Simplicity 5398 - Stretch and Sew.

I made a size 2 for my grand nephew William.


The old pattern sheet had lots of tips along the way. One of them was to put a bit of ribbon in the back so to be able to tell front from back. I know other bloggers have done this but this is the first time I have seen it mentioned in the pattern sheet.


Here is a close up of the embroidery:


I want to make a couple more but will go and buy some white singlets! I don't want to have to make the tshirts again. The shorts only took about an hour.

Young William enjoyed getting them last night and ran around in them for a while but unfortunately he wasn't very co operative in the photo department.

Sunday, December 7, 2008

Australia (the movie) - a review

Last night the girls and I went to see Australia the new Baz Luhrmann film. The film has had more than its share of bad press but being Baz fans we just had to go. (Ellen's passion for film making was ignited by seeing Moulin Rouge when she was 11). I did have to almost force Sofie to come along as she really was not keen. Well, we all enjoyed it very much!

The good:

. The film really captures the essence of the outback - the seasons - the wet and the dry, the vastness and remoteness of the landscape.


. It is a fantastic history lesson, particularly for Australian school children. I am sure it won't be long before it is on our school curriculum. This year Sofie studied Strictly Ballroom - Baz's first film and also learnt in history about the "stolen generation". This film covers the Aboriginal culture in a very positive way. It also teaches us of the tragedy of the injustice done to them. I know my generation were not brought up to respect the Aboriginal culture but the schools now teach our children of their culture, the injustices done and to pay respect to them as the original owners of the land.

. The history lesson also covers the impact of the Japanese bombing of Darwin in 1941.

. The costumes that Nicole gets to wear! This outfit I think is my favourite:


Here is a close up of the details of the cream and navy.


Princess Poochie has done a post about the shoes. I did notice the shoes in the movie but alas no close ups!

. It was a good yarn! Almost a "western" with the droving, the goodies and the baddies and the taming of brumbies. Baz starts this film in a very comical/farcical way similar to Moulin Rouge and Strictly Ballroom but then settles down into his story. Lots of fun with men fighting and general silliness. Also some shocking bits.......remember the kangaroo scene? Not sure to laugh or cry!

. Another fun thing was seeing all our great Aussie actors - Bryan Brown, Jack Thompson, Ben Mendlesohn, David Wenhan (he is so good you really hate him)...and lots more. It is a bit like spot the actor.

. We thought Nicole was perfect for the part.

. This film is just so Aussie!

The bad:

. The only thing I would say was for me was it didn't quite drag me in. It was great to watch yet I wasn't moved to tears at any time. Yet watching the Duchess a couple of weeks ago I couldn't stop the tears - so I can be moved.

. This film is just so Aussie! (lol) Crikey!

Friday, December 5, 2008

Fabric to me and more mother proudness!

On Wednesday Colette of Tessuti fabrics turned 40 and I won some fabric! How cool is that? Here is a photo of the goods along with the lovely labels she sent. I won on Wednesday and they were with me on Thursday! Thanks Colette! The silk/cotton on the far right has a lovely silky feel and I am thinking maybe a dress. The cotton in the middle is quite rough and course, so I am not sure what would be best for it. And the elephant fabric needs to be something for a little one. Perhaps a shirt for nephew Will for his 2nd birthday next Feb.


Also on Thursday we were invited to my girls Night of Excellence where they hand out awards to students for outstanding academic, community spirit, arts, music and sport achievements during the year. Both Sofie and Ellen got awards to community spirit (being involved in many school related activities). Ellen also go a house award but the biggy was the top student in media studies in VCE. She worked really hard all year and didn't lose one single mark! Mummy is very proud of both my babies.


Ellen was also so proud of herself she slept in her school uniform with her medal under her pillow..lol! So now we wait until January to find out what placement she is offered at uni.

Friday, November 28, 2008

Tess's pajamas

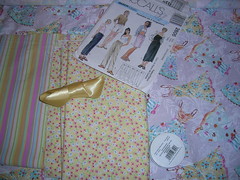
My niece Tess turned 11 yesterday and her mum suggested some summer PJ's for a present. Now we could have bought them, but no ... Sofie and I went shopping at Spotlight and came up with these:


The main fabric with the dresses print came from the curtain section and was marked down to $3 a metre ;) The pattern McCalls 2606 is an old out of print pattern but any draw string pants will do.

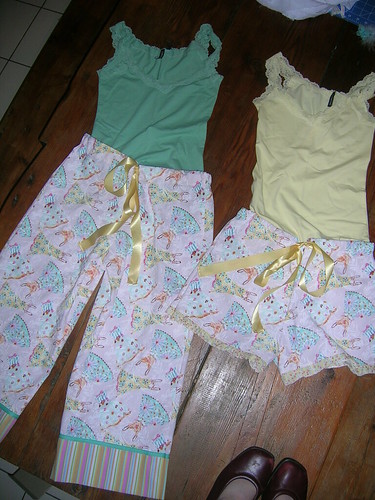
After Sunday night cutting out, Monday night sewing, and last night finishing off this is what we have:


Oops - excuse the shoes

The tops are from Glassons - 2 for $20. We actually bought them first and then went shopping for matching fabric. And two pairs of pants - perfect for Melbourne summers - hot one day, cold the next!

I didn't follow the order of the pattern but constructed in an order to make the process easier. We also added elastic to the ribbon drawstring at the back to make.

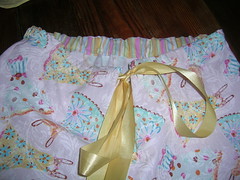
Some detail shots:

The bottom of the shorty pajamas has a ruffle that was done entirely on the overlocker (above) and the casing is the stripe contrast fabric (below).


The bottom of the longer ones have the stripe contrast print and twill ribbon added (above) and the flower print as the casing (below).

I have some fabric in the stash that Sof and I bought last year to make ourselves pj's, so I may make them up next week and take step by step photos - in case anyone is interested but also to remind me how I went about it. Just about all the sewing was done on the overlocker/serger.

Thursday, November 27, 2008

Email from Pati

After referring to Palmer Pletsch's book Fit for Real People back in my post about the muslin for Ellen's dress I received an email from Pati Palmer. How cool! You just never know who is reading....

She kindly thanked me for mentioning the book and gave me a link to the Palmer Pletsch free e-magazine. I actually met Pati way back in 1998 when she was here for the Melbourne Stitches and Craft show and she autographed my Fit for Real People book.

In the email she also mentioned Sue Neall from Sydney who does 4-day fit, pant and jacket classes in Australia. Sue is also co-author of the book Jackets for Real People. Of course any good Aussie sewing girl will know Sue from the Stitches and Craft fashion shows!

This week I have been sewing pajama bottoms for my niece's 11th birthday. Here is a picture of the magic ingredients. Tomorrow I will show the end result.

Saturday, November 22, 2008

Sofie's skirt

Sofie, my younger daughter wanted a new dress to wear to Ellen's valedictory dinner. As she is studying textiles at school I suggested she design what she wanted and we could sew it together. This was a couple of months ago. Well nothing happened and last weekend she decided she needed something new and wanted to go shopping. Shopping can be "hard work" with Sofie because if she doesn't have any luck in finding something that fits and is flattering she gets depressed and grumpy and won't even look at anything. This happened last Friday night at the shops.

Unlike Ellen and myself Sofie is well endowed in the chest department. However she is fairly petite elsewhere. So it is difficult to find flattering clothes for her. She needs fitted clothes to show that she does have a figure. And it probably doesn't help with a mother that can point out how cheap the fabric is and how badly made the clothes are!

Anyway, on Saturday morning she was going to Brunswick Street with Ellen and her father, so I suggested she drop into Clear It (an outlet shop) and see if there were any Alannah Hill fabrics that she liked. She came home with two metres of silk chiffon!

Co-incidentally she was doing a school project on 2 designers - one current and one from the past. She chose Alannah Hill (of course) and Elsa Schiaparelli. I photographed her page on Alannah:


Unfortunately, we didn't get to making Sofie the skirt until the night before the dinner as Ellen's dress took much longer than I anticipated. She decided that she wanted a floaty skirt with layers. No problem!?


Making up as we went we used a basic skirt pattern. First we cut a lining out. Then cut 3 ruffles. We made the ruffles by cutting the skirt pattern (traced) into 3 and adding a couple of inches so that we could overlap. We then cut and spread to give volumn.


We hemmed the ruffles and stitched them to the skirt. We tried to use the overlocker/serger to roll hem but it the thread was cutting the silk. In the end it was all sewn on the sewing machine. I am surprised this did not turn out a disaster - we just about gave up at 10.00pm but I kept imagining Project Runway and Tim Gunn - "make it work". And make it work we did.

Getting desperate by 11.00pm we quickly decided to just add ribbon as a waist band.

Voila - a miracle - it actually looked pretty good! Thank goodness nobody will be inspecting it too closely. But for under $20 we have a very pretty silk skirt. The ruffles are not even (I really should learn more about bias) but that is the charm, isn't it? And certainly no worse than RTW!

BTW, Sofie did some of the sewing, all of the pressing and sat with me giving encouragement. And she looks pretty darn happy with herself too.

No new clothes for me. I wore my birthday frock.


Friday, November 21, 2008

Ellen's Valedictory Dress - photos and Dior rose

Frock:Burda WOF 08-2008-126
Socks: Alannah Hill
Shoes: Old ones from the wardrobe
Hair piece: Dior rose
Makeup: Aunty Cheryl


I made the rose following the instructions from Couture The Art of Fine Sewing by Roberta Carr.


And one more, just because I can (and she is smiling):


We all had a wonderful time!

Thursday, November 20, 2008

Ellen's Valedicatory dress - some details

The skirt. There is only one pattern piece for the skirt. Like the bodice overlay it goes from centre front to centre back without a side seam. We wanted the skirt to be fuller, so I cut and spread the pattern as shown here:

Well, let me say IT DID NOT WORK. All the fullness ended up somehow in the back like a fishtail and it dropped (due to the bias at work) a good 15-20cm. It was kinda cute but NO! And of course I had already sewed it to the bodice along with the lining. So I had to unpick and recut to take out the back fullness. I also had to recut the bottom of both the skirt and lining. And take out the zip, and unpick the ribbon trim on the lining.

For the hem of the skirt I used my rolled hem foot. Perhaps a hand rolled hem may have been more couture, but I was over it by then. I am happy with the outcome - looks pretty good.

The pattern has a zip going all the way up, but as I have such a contrast in colours I did not want to show a cream zip on the blue fabric nor a blue zip on the white fabric – so I opted for a blue zip up to the bodice and buttons on the bodice. I bought the buttons from a shop in Hong Kong. They come by the metre on lace. Very pretty. I did however have problems with the elastic loops - they stretched. My solution was to put hooks and eyes behind each button (and pray that it works).

Now to some questions and answers:

Caity said “I like that dress EXCEPT - don't you think having the straps coming out from the armpits is a bit weird? Maybe it will look ok on a small figure... I dunno, it just struck me as odd!” Yes, I agree that the photo does look a bit odd. I think they must have made a larger size and pinned it at the back or something. The pattern does not have it coming out quite so far back. It does suit Ellen however as she has a narrow chest and this helps to give her width. Also the ruffle front gives her an illusion of a bust.

Karen said “It does sound tricky, I hope it works out tonight. I have found that there is an awful lot of bust room in the BWOF patterns for my teenage daughter - the SBA for her is about 4cm in a straight dart(trial and error)even after scaling down to a 32 size, so maybe it is bodacious German busts on slim girls that the pattern is drafted for, not operator error?” Yes, it was my error (somewhere) as the bust fits perfectly after my adjustment. It is just the circumference that was iffy. The muslin was fine. The dress was not – first too small, then too large and now a tight squeeze. As she is small busted it gaped when she moved and to stop that I needed to make it really tight. But then it was pulling at the back. So I have put hooks and eyes there hoping that will solve the problem. I will let you know tomorrow if she faints from lack of breathing space or if someone gets hit in the eye from the closure popping

Lindsay had the answer - “I have the same problem with my small-busted daughter. I had to buy her some of that fashion emergency tape just to prevent the peekaboo that sometimes happens”.

Designdreamer had a problem with the Alannah Hill website. I did too, but if you just keep trying (type in the URL) you will be in for a treat. You should get a key to open the door and then you are in! I am not sure if you see much fashion but the site is really fun.

And Kristy said “And I trust you've been giving the gorgeous Cour Carre suit a workout in the meantime? It's too nice not to wear all the time”. Yes I have it on today! And I did buy another suit while in Hong Kong that I have been remiss in posting about. I will do that later when I get over this week.

Trena commented “So, pardon my ignorance, but do you have the same school year as us? Starting late summer/early fall and ending late spring/early summer? It never even occurred to me that our school years would be six months staggered!” Yes our school year is in a calendar year – from late Jan/early Feb to early/mid December. So we get to break up from school and chillax into the festive season. So January here is very much a quite time as many businesses close for annual leave. Then at the end of January we have Australia Day on the 26th. So it is party central from mid December to late January – swimming, relaxing, outside activities, lots of Champagne etc – I can’t wait!

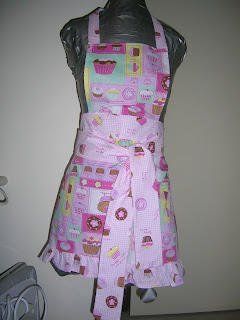
And a sneak peek at what Sofie and I got up to last night.....look what is now hanging in her wardrobe:


Tuesday, November 18, 2008

Ellen's Valedictory Dress - finished

I know I said I was going to talk about the skirt next and answer some questions..well I will leave that till tomorrow as tonight I have pictures! Yes it is finished!

Never before have I unpicked, adjusted, recut.....as much as I did with this (simple) dress.
Close up of the bodice front:
Close up of the bodice back:
Inside:
I trimmed the middle and the lining hem with a really cute blue and white polka dot ribbon. I will take photos of Ellen all dolled up on Thursday night. Tomorrow I will tell you about all the silly things I did along the way...

Monday, November 17, 2008

Ellen's Valedictory dress - the bodice


Burda 8-2008-126. Last week I made a muslin of just the bodice of the dress. The pattern starts as size 36 and Ellen's bust measures 78cm. I penciled in on the pattern sheet a size 34 and then traced that. This is the first time that I drafted the smaller size before tracing and I found it much easier to work around. You can see the pencil line on the blue piece.


I made the muslin in the size 34 even though she is smaller still. We pin fitted the muslin and found we needed to reduce the curve of the bust (not quite filling that out) and taking the side seams in a bit. I used the instructions in Palmer Pletsch Fit for Real People to do the small bust adjustment.
I reduced the curve in the side piece and also reduced the length in the centre front piece. This worked beautifully and the cups fit her just right.


Now that was the good bit. The not so good bit was with the overlay. It is in one piece that goes from centre back across the front and back to centre back. As there were are side seams I needed to take circumference length out.
Also note all those pleat markings? Just imagine trying to mark, pin, baste all those and then they don't fit the bodice? Hmmm. I unpicked all that and made my own pleats to fit ensuring they looked pleasing enough. Much easier option!

All was going well until the next fitting. Oh, no...it does not meet at centre back! I am sure I added the seam allowances when cutting, but something went wrong. So onto plan B or is that C or D by now? I added the extra width by adding some panels at the back (remember there are o side . I then sewed on the buttons, inserted the zip and attached the skirt. Time for the next fitting.


The skirt has issues but I will talk about that tomorrow! Back to the bodice - it is TOO BIG! The poor girl is exposing herself each time she moves. Now, I would like to blame Burda but it has to be operator error - just not sure what error(s) they were. Anyway, back to ripping and resewing. I managed to not have to take the zip out by just gathering the extra back width into the bodice. Now I am just too scared to get her to try it on again!


This morning before work I was back at it trying to get the V to sit nicely at centre front where the skirt meets the bodice. It is not co operating! Perhaps tonight it will be a bit nicer to me.

Thanks to everyone who commented on my last post and for welcoming me back! I have a few questions to answer but will attend to that in my next post. Wish me luck!