Sunday, April 20, 2008

De-Mystifying Fit: Using the moulage to adjust commercial patterns

As I mentioned in a previous post, I had purchased the CD book - De-Mystifying Fit: Using the moulage to adjust commercial patterns by Lynda Maynard. I heard about this book on Patternreview. It cost US$27.95 (less for members of PR). $8 international postage.

The CD book comes just in a CD case without any pretty cover or printed notes. It is a PDF file that you can print out. I printed mine out on my home laser printer - all 282 pages of it.

It has an introduction, notes on the photos and how the book is set out, and then the process of using the moulage to adjust the commercial patterns. You don't need Kenneth King's moulage to be able to make use of this book. Any sloper that fits you will work. The examples in the book show mainly a sloper with wearing ease.

The book contains 9 case studies and covers just about everything including bust adjustments, petite adjustments, sloped shoulders, large hip etc etc.
I used my sloper made from my saran wrap. I used this method of fitting for my party frock and now am putting it to test on Burda 09-2007-109.

109 comes in sizes 36 to 44. I need a 34 in the shoulder and chest area. I could have graded down the 36 but decided to start with the 36 and compare to my sloper. This pattern is called a blouse jacket and is more of a blouse really. I won't be wearing anything under it except maybe a cami or t-shirt. And it does not have shoulder pads. So I can use my sloper as it. I don't need to adjust the sloper as I would for a tailored jacket.
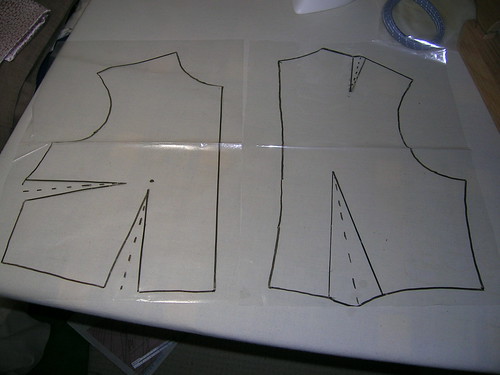
(click on the photos to see the pencil lines of the pattern. The black lines are my sloper on plastic)

This picture shows me putting my sloper over the back and side back pieces. I match up the waist and check my neck shoulder point with the pattern. I need to shorten my back by 2cms.
Once I have done that I check for shoulder slope(adjustment needed here too). The back is also too wide - see the armhole? The next photo shows the changes made so far in red. I have adjusted the armhole halfway between the pattern and my sloper. I am hoping that this will work - bringing it down to about size 34 but also leaving a bit more ease.

You can see my new cutting lines in red. I have adjusted the shoulder according to my sloper - taken it out and down a bit. I am not sure whether I should adjust the neckline as well. I have just drawn a dotted line where my sloper goes. I can check this when I get to the muslin stage. Also I am not sure about my curved back. Do I add a back seam to fix that? Or adjust the side back seams? So much to learn..... Hopefully the muslin will also tell me something there. I am sure I will have more than enough ease and I can take the seams in to fit where I need.

Also you can see my sloper has a back dart but the pattern has princess lines. My dart is larger than the dart created by the princess line so again another reason to think that this pattern will need to be taken in in the seams.

Next post I will show the my front adjustments.

Wednesday, April 16, 2008

Saran wrap

Thank you all so much for the birthday wishes (yes it was the big 50..ick). And for all the lovely comments on my dress. You guys really appreciate the effort that has been put into fit and then the extra details. No one at the party seemed to "get" how excited I was about the dress, except perhaps my two gorgeous daughters.

With the success of the dress I feel now that I can blog about the saran wrap process, my sloper comparison to pattern et al! I have also received the fitting DVDs from Mary Beth and have watched them so will do a review later this week on those too. I have to say I really enjoyed watching them and learnt a trick or two.

So now to the saran wrap. I learnt about this from Liana and Kathleen Fasanella. Liana recently did a post on her experience with the process and also has links to Kathleen's tutorial. Here is also a link to the tutorial.

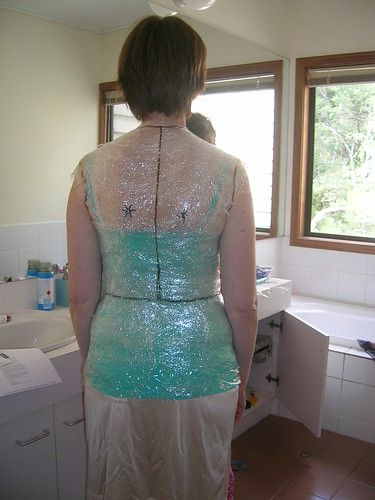
This was a very easy thing to do and I only needed the help of two teenage daughters. Really one would have done but the more the merrier! So some photos:


We used small pieces of saran/glad/cling/sandwich wrap. At first it did not seem to want to stick to my body but as we put more and more layers on it stuck together quite well. We marked main body points - apex of bust, apex of shoulder blades, armscyes, neckline, waist. We used sticky tape to tape the lines on the side, back and front before cutting those lines so that they would not distort.


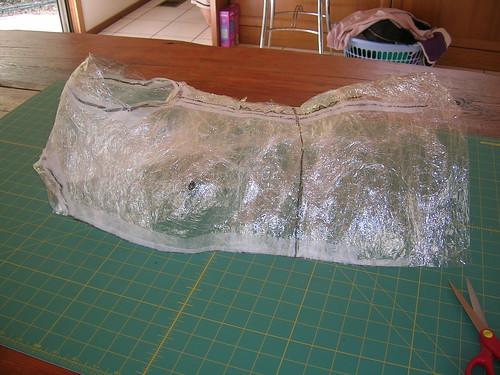
After cutting the wrap off it still has the shape of my body. We need to turn it into a flat pattern. I decided to just do the waist up. But have kept the hip area for later use. I may one day redo the exercise and have a complete sloper, I'll see how well this works first. But either way it is not a big exercise to do. Maybe half an hour?

From here I cut darts to flatten the wrap, copied it onto paper, rotated some darts and added some ease. Details on rotating darts can be found in Fit for Real People and also in many other books (and probably somewhere on the internet).

I have now copied the sloper onto plastic to make it see through. This will make pattern adjusting easier. I didn't have this when I adjusted the green party frock pattern but this will just make future pattern adjustments easier.

I have documented the process on my Flickr album here. Hopefully the process is clear enough.

Next post I will talk about the Linda Maynard CD book that I purchased that shows how to adjust patterns using your personal sloper.

Sunday, April 13, 2008

Party frock!


It was my birthday last Thursday and last night we had a bit of a party. So a girl needs a party frock...

I used Burda 1/2007 106. I put a lot of fitting skills to making this dress which I will post about separately.


Cheryl (DS) and me in the frock!

The dress cost me less than $20! The main fabric was a remnant purchase of 95cm X 138cm wide rayon/poly/nylon from Cleggs in Melbourne called Star Shimmer Fern. The county of origin was India. Don't you love the dockets that give all that info? And it cost all of $4.75!!I lined with some remnant green lining I had left over in the stash from another project. I also beaded the zip and neckline with glass seed beads from Spotlight.


I was inspired to try a hand picked zip after seeing Laura's version.

I was also inspired by Summerset's beading and had a go at beading around the neckline following Summerset's instructions on Jan 02 2008 (sorry I can't seem to get a link to work to go directly there).


Blogger is misbehaving and won't play fair (I can't upload anymore photos), so I will finish off now, but you can see more in my album or over at Patternreview.

Wednesday, April 2, 2008

Excellent Blog award.


Gwen of After the Dress has nominated me with the "excellent blog" award. Thanks Gwen!! I very humbly accept. My acceptance speech needs to include another 10 blogs to be nominated....there are so many fab blogs out there sharing advice, creativity and friendship. To spread the love around I will try and not double up on any blogs that have already been nominated.

Gwen has nominated her 10
Summerset has nominated her 10
Shannon is updating her blog list

and I nominate:

Princess Poochie (not sewing but Shoes!!)
Claudine (doesn't post often but makes gorgeous garments)

Ok, that was hard! Too many to choose from. Keep blogging ladies - when we don't feel the energy to sew, reading about it is ALWAYS good!!

Sunday, March 30, 2008

I'm a winner and a new muslin!

Sigrid, Tany, Marji, Els and Angela nominated me for the Threads DVD giveaway that Mary Beth was kindly giving away and lucky me I won! I am so looking forward to receiving them and putting them to good use. Thanks ladies :)))


In the meantime I have received Lynda Maynard's fitting DVD and have been working with my sloper. I decided to work with the free Marfy pattern 1101. The smallest size is 44 and I at least 42 but maybe smaller. However after reading Lynda's book I thought I could work with the size 44 and agree it to my sloper. Remember I made my sloper from the saran wrap (which I promised to blog about but will when I am more confident that it works).


I laid my sloper over the Marfy (which I had cut out as a size 44) and made the following adjustments:


Back:
Took out 4cms in the back between waist and armhole
Took out 1cm each side from shoulder to hem
Took out 2cm below the waist
Reshaped the armhole (my line is the inside line and the original pattern is the outside line)
Tapered the shoulder line a tad.


Front:
4cms out between waist and bustpoint
Lowered bust point a bit more and redrew dart legs
2cms out below waist
Reshape the armhole (my line is the inside line and the original pattern is the outside line)
Taper the shoulder line a tad.


I also adjusted the sleeve to take out some extra ease from the front.


Now to the muslin:


(BTW, I have the cuff only on my left sleeve and oops, I have it on upside down. Oh and the dart looks like it is going too high but that is just a crease from my pressing.)

I was pretty happy with the front but had found it to be tight to move my arms. So I look 1 cm in on each side seam and adjusted the sleeve as well. This helped. I think I still need to reduce the ease in the sleeve cap a bit in the front.


The back, not so good! It is tight if I pull forward (see the horizontal pull up high on shoulder blades) and theres lots of fabric further down.


After putting in some darts and tucking a bit for a straight back this is what I have - much better but I want to go back and work on that further.
I had DD cut the upper back to see how much extra I need. I need it up high to cover shoulder blades but not around the armhole....mmm....maybe a shoulder dart. Need to go back and review sloper with pattern.


I plan on making this is a soft cotton so it will not be as stiff as the calico but will still have body and no stretch. So I mustn't over fit but when do I say - this is how it should look? After all I do have to be able to move in it.

I googled up this pattern and came up with a post by Liana and Sigrid. Both have made it before. If either of you are reading can you comment on what you did with the back on your versions? Did you leave it as per the pattern or did you shape it a bit? ETA - Both Liana and Sigrid have done reviews on PR - neither adjusted the back. Also Sigrid pointed out the error in the cuff - no wonder I put it on the wrong way!

Sorry if this post is a bit disjointed, but I am just playing at the moment. When I am confident that my alterations will work I will post a better example of how I went about the changes. In the meantime any feedback is always welcome :))

Friday, March 21, 2008

Popping in to let you know where I am up to.....

It has been a few weeks since my last post and I have to admit to no sewing, no fitting and just about no energy! It has been unbearably hot here (but cooler since Wednesday - and yes today we have the heater on) and I don't work so well in the heat. And when I say hot I mean sweat dripping off me onto the patterns hot! Pretty unseasonal for this time of year. It usually is just perfect autumn weather.

And to be honest I think I have lost a bit of confidence with the fitting! A bit like - OMG, where do I go from here? My plan is to make a shirt using my sloper as a guide. I have been checking out my Burda's but there are very few patterns in size 34. And to be honest again, I am not really a shirt lover (much prefer knits) so I am not getting overly enthused. But I think it would be good start to work on real clothes in a basic shape with what I have learnt. And I do have some shirting fabrics in the stash....wonder how they got there!?

I have been on the Internet a lot and have been enjoying everyone else's blogs - so thank you for that! I have also read the chat over on PR with Kenneth King and Lynda Maynard. Lynda has a CD book on adjusting commercial patterns using a fitted moulage. I figure my saran wrap is the same as a moulage as it has no ease, so I have ordered the CD book. Lynda mentioned that you start with matching your moulage waist with the waist of the pattern and then check out the shoulder point and make adjustments to fit. So I am hoping this CD book will send me in the right direction.

Also this morning I read a post by Lisa over at Blackwater Park on fitting and a book by Natalie Bray called Dress Fitting. The post called to me so I Googled up the book and it is available on an Australian Website - which means low postage and (hopefully) quick delivery. So that is ordered too!

This afternoon I will be going up to Shepparton (yet again - this is where my weekends are going) and won't be back until Monday. So the sewing will have to wait a bit longer. Maybe a bit of tracing out can be done while away.

Hope everyone has a very restful Easter and I will catch up with those Easter outfits next week!

Monday, March 3, 2008

Fitting - part 5 - saran (cling) wrap

This post is for Marji who had just left a comment asking for an update on the next stage. Marji has been helping me with some of those pesky fitting issues. I am still not satisfied so I have been delaying my report.


On my last post I made up a size 36 Burda blouse pattern which wasn't too bad but I felt still had some major issues around the shoulders, arms, front, back....well everywhere. So while reading my FFRP and also checking out a Palmer Pletsch pattern I have, they strongly suggest you start with a size that corresponds with your upper chest. That would put me in the size 34. So I made a muslin in 34 - better but still the same issues.

I can see armhole folds and gaping , shoulder "arrows" (btw, I did do a forward shoulder adj with this one), excess fabric in back below armhole and what would appear to be a prominent shoulder issue.

I have really appreciated all the feedback everyone has given me and I have tried all your suggestions. A common theme was to do a sloping shoulder adjustment.

On left no shoulder pads, on the right shoulder pads. The arrows to the shoulder are a bit worse and the neckline now is raised. And the armhole folds are not fixed. So no, it is not a sloping shoulder problem.

I played around and if I folded out a dart from bust to armhole it seemed to fix the problem. I don't think FFRP addresses this issue very well and I just wasn't confident in what I was doing.

So forward and onward I decided to have a go at the saran wrap. I had heard of this from Liana and followed the tutorial and Kathleen's Fashion Incubator site.


ok, no laughing! I will do a separate post of this later this week, but this photo will do for now to show your how I came up with this:

Most issues are gone! I can't quite figure out the lines just under the shoulder seams. I spent most of yesterday afternoon pinning, adjusting, resewing etc. In the end I have come to the conclusion that I have the neckline going too far up my neck or the folds are due to a dip in my shoulders - there is quite an indentation where my bra strap goes. The camera does magnify the lines. In the mirror they are barely visible.

So that is where I am up to. Next is to compare the sloper to a standard Burda 34 and see what adjustments I need to do to that to make it work. I am figuring the list will include:

  • Petite adjustment
  • Forward shoulder
  • Rounded upper back
  • prominent shoulder blades
  • narrow lower back
  • sway back

and the list goes on.........

I tell you, ignorance was bliss!